Welcome !


Welcome to Made Down South! Thanks for stopping by to see what I'm up to. This blog serves as my review of projects accomplished since I have way too many that are halfway done. I also tend to have so many urgent ideas where I simply have stop all else to work on the newest thing. So, this blog will show all the ideas that actually get made into stuff! Some of that stuff is available for sale at our etsy shop, Down South Designs.

Wednesday, February 3, 2016

Tutorial: Sewing a Quiet Time Playmat


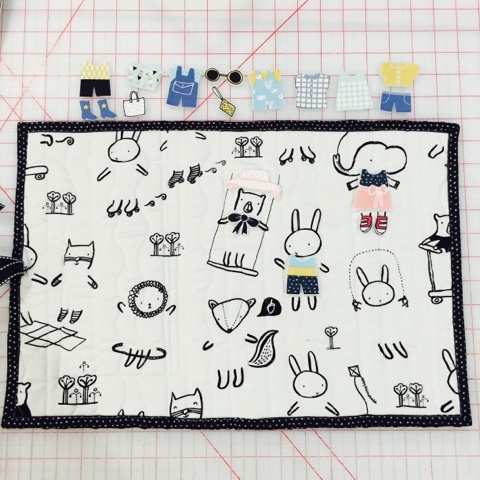
Here's a quick tutorial for this sweet little playmat. I designed it with a pocket to hold the dress up outfits and ties so it can be rolled up nice and neat. I thought it would be great for my littles to use as church/car toy or even as a placemat when eating a snack in the car.  Of course, I'll make extras to sell in my Etsy Shop, Down South Designs


Supplies: 
1 fat quarter Dress Me For Playground    Black/white
1 fat quarter Dress Me For Playground Clothes in Multi
1/4 yd (wof) Dress Me For Playground Black Hearts
1 fat quarter your choice for mat backing
Fusible Fleece
1/2 yard grosgrain ribbon

Cut two 2 1/2" strips and two 5 1/2" x 6 1/2" squares from the black heart fabric.  Sew the two squares right sides together along side, top, side. Turn inside out and iron. Fold over the raw side in twice and sew closes with straight stitch to finish your pocket.  Sew together the 2 1/2" strips and iron in half lengthwise for your doublefold binding.  Set aside. 

Prepare the clothes by ironing fusible fleece to back side of playground clothes fabric. Using sharp scissors, cut out each one.  If you iron on cotton setting, these clothes should hold up well to little hands!  The fleece backing really helps the outfits cling to the playground fabric. 

Cut 14" x 20" sections of black and white playground fabric, fleece and back fabrics. You can iron it if using fusible fleece. I actually used cotton batting scraps because I had that available. I added some quilting just for fun but it's optional.  Position your pocket wherever you want on the back side. Pin well and stitch close to edge at side, bottom, side. 


Stitch on the doublefold binding as you would for any quilt project.  Remember to tuck your grosgrain ribbon inside the binding at center of one side. 

TA DA!! I purchased my fabric online at Bloomerie Fabrics. Great shop, great people! The fabric line is Wee Gallery by Dear Stella. 


Wednesday, January 21, 2015

Wednesday Progress: Creative Play


This started out as creative play and has turned into a pillow for my great niece. Just needs hand sewing to close up the edge and I'll be finished!

I've been trying to get a handle on my mountain of scraps. After tiring of cutting them into strips and squares, I had a different idea. I ironed Transweb fusible onto them and drew out template shapes on paper side. I cut and collected quite a few for creative playtime. 


I had fun designing this flower/ferris wheel---I can't decide what it is!  I put decorative edge stitching on before placing the next layer of elements. 


I thought mixing up the thread colors added a bit of interest too!  I used lots of low volume text prints on front and back. The little lady is quite the avid reader now and I know she will enjoy learning new words looking at her pretty pillow. 

I will be sharing at WIP Wednesday and Finish Up Friday this week. 

Sunday, November 23, 2014

Sewing Sunday


My first quilt along!  I found out about the Wallflower Quilt Along on Cluck Cluck Sew's blog.  Since I had the pattern in my "hope to make" pile of projects, I decided to sign up for the quilt along at Bloomerie Fabrics.  Their shop is grand and had these collections of fabrics set up for the quilt along.  I liked their fabric offerings but chose to use my own stash for this attempt.  I'm sure I will be a future customer because the shop is fabulous!  
  

I pulled a variety of aqua, blue, and navy fabrics to mix and match. I love using the feedsack floral (lower left in photo above) next to modern geometric fabrics!  The floral lace and the mint, coral, blue floral are also both very old fabrics.


The pattern called for a straight set 3 x 3 layout. I chose to put my own spin on it though. I split one of the blocks in half and offset the middle row.  Then, I spaced out the blocks more by framing each with an extra border of white.  I liked the original pattern but love the effect of these little changes I made. 
 

I tossed and turned that night as I dreamed of quilting options for this quilt. By the time I woke up, the answer was a new design to experiment with. 


I quilted my snowflake star design on the backside as this is always easier for me to stitch white on a dark rather than stitching white on white. 


I enjoyed the quilt along experience and look forward to trying another one soon!


I will be posting this week at Freshly Pieced and CrazyMomQuilts. 
 

Wednesday, November 12, 2014

Wednesday Progress: Vintage Grandmother's Fan

Lots of works in progress in my sewing studio this week!  


Here's a fun quilt top that a customer asked me to quilt in an authentic style of the 30's era.  This hand pieced quilt top had been passed down through her family and she wanted to have it completed as a wedding gift for a family member.


The maker of this quilt top was so careful with her scraps and pieced them so well that you had to look closely to see which fans were "made do" from pieces of fabrics. 


I felt like I was on a treasure hunt when I examined her work and the lovely old fabrics. Such a joy!   She was an excellent quilter and obviously took pride in her work and was quite thrifty with her fabric scraps!


I used Quilters Dream cotton batting and plain muslin for the back. It measures 88" X 98". I hope to finish this week. I have many more projects to complete before Christmas!

Wednesday, October 22, 2014

Progress: Memory block quilt blocks


My friend, J, and I have been trying to get our improv groove on and make these memory clothing blocks. It's a project that my church group of sewists at the Mustard Seed is doing for a local family who recently lost a loved one. 


We stabilized each section of clothing fabric so that we could combine different textures and have success!  


The plan is for these 12 1/2" blocks to be placed into shadow box frames with personal embellishments attached.  I think it's a great idea and I can't wait to see the final outcome!

I will be posting at Freshly Pieced this week